Pages

Monday, March 28, 2011

Jen's Oven Roasted Red Potatoes

These potatoes are a Spring/Summer staple food in our house. We all love these. I usually roast them in the oven, but they are also great on the grill. I make a large bag out of nonstick foil, place the seasoned potatoes in it (sometimes with a chopped onion) and seal it well. Grill over medium-high heat for about 30 minutes or until tender, flipping the bag every 10 minutes. When my family and I are camping, I like to reheat the leftover potatoes the next morning for breakfast as hash browns. Yum! I can't wait for the snow to finally be gone and the warmer weather to stay so we can go camping! It has been a very long winter here in New England!


Jen's Oven Roasted Red Potatoes

All the measurements are approximate (I just eye-ball it), so please feel free to use less or more seasoning to your desired taste!

2-3 lbs red skin potatoes, skin left on
2 T extra virgin olive oil
1 T seasoned salt
1/2 tsp onion powder
1/2 tsp garlic powder
1/2 tsp Italian seasoning


Preheat oven to 450 degrees. Line a baking sheet with nonstick foil or spray regular foil with cooking spray so the potatoes don't stick.

Once the potatoes are washed, cut into slightly larger then bite size pieces. Then place into a large mixing bowl.

Then add the oil and toss to coat potatoes well. Add the remaining ingredients to the potatoes and mix well so that each piece is well seasoned.


Spread the potatoes onto the lined baking sheet in a single layer. Roast in the oven for about 20-25 minutes, until tender. Then, for extra browning and crispness, turn the oven to HIGH broil and cook for another 1-2 minutes. Watch this closely because the potatoes will easily burn!


Remove from the oven and let sit for 2 minutes before serving. Enjoy!


Thursday, March 24, 2011

Double Fudge Oreo Crunch Cookies

These cookies are definitely one of my family's new favorites. They are awesome. I mean, who wouldn't like Oreos mixed into chocolate-chocolate chip cookies?! All I can say, is that you need to bake these soon!


Double Fudge Oreo Crunch Cookies
(recipe from How Sweet It Is)

1 cup unsalted butter or margarine, softened
1 1/2 cups sugar
2 eggs
1 tsp vanilla
2 cups flour
1/2 cup cocoa
1 tsp baking soda
1/4 tsp salt
1 cup semi-sweet chocolate chips
1 cup crushed (regular) Oreos (about 10 whole cookies)


In the bowl of a mixer, cream together butter, sugar, eggs and vanilla. Add the flour, cocoa, baking soda and salt. Mix well.

Stir in the chocolate chips and crushed Oreos with a spatula.

How GOOD does that look!?


Cover the dough and refrigerate for 2 to 4 hours (or longer, if desired, but chilling is necessary).

Preheat oven to 350 degrees. Scoop out dough into large rounded tablespoons and place onto parchment lined cookie sheets. Bake for 10 to 12 minutes. Let cool and then enjoy!


Monday, March 21, 2011

Baked Haddock

I love Haddock. I love it breaded, fried, grilled, broiled or baked. It doesn't matter how it's cooked. It's one of my favorite foods and definitely my favorite fish.

I came across this recipe recently and it just sounded so good. I had to make it. Luckily, haddock was on sale at our grocery store so I quickly added it to our menu plan. To my surprise, when my husband read the menu, he was excited to try it.

We both really enjoyed it and I will definitely be making it again and again. The flavor is wonderful and the buttery Ritz crackers on top complete it. I would almost consider this dish restaurant worthy...it's that good. Although it goes against my "healthy" way of cooking, I am so glad I found this recipe because it has easily made it's way as one of my top ten favorites.


Baked Haddock
(adapted from Dawn's Recipes, serves 2-3)

1 lb haddock fillets

3 T salted butter, melted

3 T white cooking wine

1 T lemon juice

10-15 Ritz crackers, crumbled

Parsley (for garnish)


Preheat oven to 425 degrees.

Rinse fish fillets and pat dry with a paper towel. Cut in half, if desired, to fit in the baking dish.

Combine melted butter, cooking wine and lemon juice. Pour a few tablespoons into the bottom of a square baking dish.

Place fish fillets on top of the butter mixture in the baking dish. Then pour remaining butter mixture over the top. Evenly sprinkle the Ritz crackers over the top of the fish. Then lightly sprinkle with the parsley.


Bake, uncovered, for 15 minutes or until the fish flakes easily. If the Ritz cracker topping starts to get too brown, lightly tent a piece of foil over the dish and continue to cook until done. Enjoy!


Saturday, March 19, 2011

Toasted Turkey Meatball Subs

One of my husband's favorite fast foods is the foot long meatball sub from Subway. He doesn't eat it very often, which is a good thing, because that particular sandwich is loaded with calories and fat.

I really enjoy creating my own "healthier" versions of fast food at home. It's kind of a challenge for myself to see if I can take a fast food item that's fatty, greasy (and so good that millions are sold everyday) and turn it into a good-for-you fast food that still tastes just as good.

These turkey meatballs are really good. They have a good flavor and just a small kick to them. I slow cook them all day in a marinara sauce so they are juicy and very tender, but not mushy. I like to serve them on homemade baked sub rolls, but sometimes I just buy the fresh baked torpedo rolls from my local grocery store. (The meatballs and marinara are also great served over cooked whole wheat linguine noodles)

Here's my recipe:


Toasted Turkey Meatball Subs
(makes 6 servings)

For the meatballs:

2 lbs lean ground turkey (93/7)
1 small onion, finely diced
2 - 3 cloves fresh garlic, finely minced
1 egg, slightly beaten
1/2 - 3/4 cup bread crumbs
1 T Italian seasoning
1/2 tsp garlic powder
1 tsp seasoned salt or kosher salt (I used seasoned salt)
1/4 tsp ground black pepper (or fresh cracked)
1/4 - 1/2 tsp red pepper flakes (to desired taste)
1/4 cup grated Parmesan/Romano cheese blend
2 jars (1 lb, 8oz each) favorite marinara sauce (or equivalent amount of homemade)
1- 14.5oz can of diced tomatoes, drained


For the assembly:

6 - 6 inch sub rolls
1 cup shredded reduced fat mozzarella cheese


Directions:

Preheat oven to 325 degrees.

In a large bowl, mix together all of the meatball ingredients except for the marinara sauce and diced tomatoes.

Line a baking sheet with non-stick foil (or use regular foil sprayed with cooking spray).

Scoop out about 2 full tablespoons of the turkey mixture and, using your hands, roll into tightly formed balls. Place onto the lined baking sheet. Repeat until all the turkey is used. This should make about 20 large meatballs.

Bake the meatballs in the oven for about 20-22 minutes. Then turn the oven to LOW broil and cook for another 3-5 minutes until the tops of the meatballs start to brown a little.

Meanwhile, place a slow cooker liner in your slow cooker (if desired-I always use them for easier clean up). Add the marinara sauce and diced tomatoes. Turn slow cooker on to HIGH.

Remove meatballs from the oven and immediately transfer to a paper towel lined plate to drain off the excess fat.


Then add the meatballs to the slow cooker, carefully, making sure to submerge each in the marinara sauce.

Cook on HIGH for about an hour to an hour and a half, then turn heat to LOW and continue to cook for another 5-6 hours.

When ready to serve, set oven to LOW broil. Line a baking sheet with foil. Slice each sub roll lengthwise about 3/4 of the way through, opening them carefully. Then add three meatballs to each roll and some extra marinara sauce on top of each. Then sprinkle each sub with shredded mozzarella.


Place in the oven and toast for 3-4 minutes or until the cheese is melted and the rolls are slightly toasted. Watch this closely so the bread doesn't burn.

Serve with a nice green salad and extra napkins! Enjoy!


Wednesday, March 16, 2011

Mini Chocolate Chocolate Chip Cupcakes

We recently attended an art show at our local library hosted by our kids' school art teacher and music teacher. It was a lot of fun and there was a ton was great art displayed created by kids in kindergarten through the fourth grade. I was so happy to see so many parents and kids at the show. I think it was a huge success and I hope the teachers will continue to do this every year.


Naturally there was going to be food at the art show. I had committed myself to bringing something, but during the day of the show, I was so super busy that I completely forgot. At 4 pm (the show started at 6:30pm, plus I still needed to make dinner) I found myself scrambling to find something to make. I didn't have time to make cookies so I decided cupcakes was the route to go. I needed to make a lot in a short amount of time so I opted to make mini cupcakes. Then I got the urge to make chocolate chip cupcakes so I read quickly through all of my chocolate cupcake recipes, meshed a couple together and came up with a super easy version that I was pretty sure was going to work. I paired the cupcakes with my all-time favorite milk chocolate frosting and the results were fantastic. Lots of people came up to me at the art show telling me how much they loved the cupcakes. I was very pleased because I didn't try one before I left so I had no idea if they were any good or not.


Here's the recipe:


Mini Chocolate Chocolate Chip Cupcakes
Makes about 30 mini or 12 regular sized cupcakes

For the cake:

3/4 cup unsweetened cocoa powder
3/4 cup all-purpose flour
1/2 tsp baking powder
1/4 tsp salt
1 1/2 sticks (3/4 cup) margarine, softened
1 cup sugar
3 eggs
1 tsp vanilla
1/2 cup light sour cream (can use regular, I had light on hand)
1/2 cup mini chocolate chips


For the frosting:

2 3/4 cups confectioners' sugar
6 T unsweetened cocoa powder
6 T unsalted butter, softened
5 T evaporated milk
1 tsp vanilla


Preheat oven to 350 degrees (325 for a dark colored pan).

Line a mini muffin pan with paper liners.
In a medium sized bowl, combine the cocoa, flour, baking powder and salt. Set aside.

In a bowl of an electric mixer, cream together the margarine and sugar until light and fluffy. Add the eggs, one at a time, mixing well after each addition. Then beat in the vanilla.

Beat in half of the flour mixture on low speed and mix well. Then add the sour cream and mix. Then blend in the remaining flour mixture. Stir in the chocolate chips.

Spoon about a tablespoon of batter into each paper liner (I used my tablespoon cookie scoop to make sure all the cupcakes were equal in size).

Bake for about 12-15 minutes or so, or until a toothpick inserted in the middle comes out clean.

Cool completely before frosting.

To make the frosting, beat all the ingredients together until smooth and creamy, adding more sugar or milk to create desired consistency. The frosting will set so cover tightly until ready to use.

Enjoy!


Monday, March 14, 2011

Creamy Herbed Chicken Penne

Here's a great way to use up left-over chicken. This meal is quick, easy and pretty tasty. My whole family loves it and requests it often. I double the recipe to feed my larger family and we always have left-overs, which I have NO problem re-heating over the next day or two for my lunches :)

This goes great with some homemade crusty garlic bread or herbed Focaccia bread.


Creamy Herbed Chicken Penne
(adapted from a McCormick recipe)

8 oz uncooked whole wheat penne pasta
1 1/2 cups fresh or frozen small broccoli florets, cooked
1 1/2 cups fat free half and half
4 oz Neufchatel cheese (1/3 less fat than cream cream cheese), cubed
1 tsp dried oregano leaves
1 tsp dried rosemary leaves
1 tsp dried thyme leaves
1/2 tsp garlic powder
1/2 tsp onion powder
1/2 tsp kosher salt or sea salt (or season to taste)
1/8 tsp black pepper
1/4 cup reduced fat grated parmesan cheese, plus more for sprinkling
1 1/2 cups chopped, cooked chicken


Cook the pasta in a large pot as directed on package. Drain well. Cook broccoli and drain.

Meanwhile, bring half and half to a simmer in a medium saucepan over medium heat. Then reduce heat to medium-low and stir in the cream cheese, oregano, rosemary, thyme, garlic powder, onion powder, salt and parmesan cheese. Whisk until cheese is melted and sauce is well blended. Add the cooked chicken and then simmer for about 5 minutes, until well heated.


Place the pasta back into the pasta pot (or a large pasta serving bowl) and add the broccoli. Pour sauce over the pasta mixture and toss gently to coat well. Serve immediately with extra parmesan cheese on top. Serves 4-6. Enjoy!


Friday, March 11, 2011

Lemon and Herb Pork Chops

I've been experimenting a lot lately with traditional French cooking. I am French, after all, so I feel it should be my duty to enrich my kids with some classic French cooking. I can't have them growing up thinking the only real French foods they've ever had are french fries and french toast, that just isn't right. So, the first place I started looking for some classic recipes was my mom's collection of recipes. Her mother (my grandmother) was French-Canadian so my mom had a lot of great recipes from her, but most were for large family gatherings during the holidays, not exactly every-day type foods. So, I turned to where most people start looking when they think of French cooking: Julia Child. She's the master and her recipes are amazing.

So, one of the first recipes from Julia that I would like to share with you is actually pretty easy and simple, but very flavorful and delicious. This recipe is best made with boneless pork chops, but boneless chicken breasts would be good as well. To start, you need to make the marinade:


Lemon Juice and Herb Marinade

For every pound of meat....

1 tsp salt (I used kosher)
1/8 tsp black pepper (I used slightly more per pound and cracked instead of ground)
3 T fresh lemon juice (I also added about a 1/4 tsp of lemon zest)
3 T extra virgin olive oil
3 parsley sprigs, chopped
1/4 tsp dried thyme or sage
1 bay leaf
1 clove mashed or minced fresh garlic (I used double per pound)


Directions:

Rub the salt and pepper onto both sides of the meat.

Mix the remaining ingredients in a bowl or plastic storage container. Add the meat and turn to baste in the marinade and coat well. Cover and let meat marinade in fridge for at least 2 hours (I highly recommend marinating for 6 or more hours--possibly over night, for best flavor). Turn meat in the marinade every couple of hours so they marinate evenly.


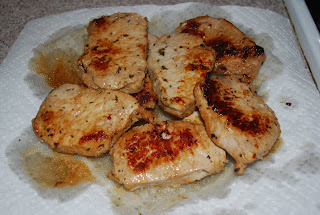
When ready to cook, scrape marinade off of the meat and pat meat dry with a paper towel (this is crucial). Then add 3-4 T canola oil to a heavy skillet and heat to almost smoking.

Cook meat for 3 to 4 minutes then flip to finish cooking on the other side.


Julia recommends serving this meat with garlic mashed potatoes. Enjoy!


Monday, March 7, 2011

Asparagus Shepherd's Pie

Shepherd's Pie is a traditional New England casserole usually made with corn, but this is a great twist on the classic. The things I love most about this dish are the sage flavored potatoes, which are wonderful, and all of the asparagus. When combined with the meat, it makes for a delicious and hearty meal. This is one of our favorite fall/winter meals and is also loved by our extended family that lives in Tennessee. Whenever they visit, they request that I make this for them. Hope you enjoy it too!


Asparagus Shepherd's Pie
(adapted from a recipe in the 1998 Taste of Home Annual Recipes Cookbook)

3 lbs red potatoes, skin left on, quartered
1 1/2 lbs lean ground beef
1 tsp seasoned salt
1/8 tsp cracked blacked pepper
1 large onion, chopped
4 cloves fresh garlic, minced
2 cans (10-3/4 oz) condensed Cream of Asparagus Soup, undiluted (I use reduced fat, if I can find it or you can use homemade)
1 1/2 lbs fresh asparagus, trimmed and cut into 2 inch pieces
1 cup milk (this is approximate, use desired amount)
1/4 cup margarine or butter (I use light margarine)
1 1/2 tsp dried sage leaves
1 tsp kosher salt
1 cup shredded mozzarella cheese
Preheat oven to 350 degrees.

In a large pot, cover potatoes with water, bring to a boil and cook until very tender, about 15 minutes.

Meanwhile, in a large skillet, season ground beef with seasoned salt and cracked pepper and cook for 4-5 minutes. Then add the onions and garlic and continue to cook until beef is cooked through and onions are tender. Drain and remove from heat. Stir the soup into the meat and mix well. Then pour meat mixture into a 9 x 13 baking dish greased with cooking spray.

Cook the asparagus in a small amount of boiling water until crisp-tender, about 4 minutes. Drain and then place over the top of the meat mixture.


When potatoes are tender, drain and then mash with the milk, butter, sage and salt. Then place over the top of the asparagus. Sprinkle the top of the potatoes evenly with the shredded cheese.

Place in the oven, uncovered, and bake for 20-30 minutes until bubbling and cheese is melted. Enjoy!


Thursday, March 3, 2011

Baked Manicotti with Prosciutto

This is a great recipe. It's simple, yet very flavorful, and actually pretty darn fun to put together. Regular manicotti can be a huge mess to fill so this variation is like a breath of fresh air. Using no-boil lasagna noodles instead, makes this dish super easy and leaves a lot of room for creativity.
Let's get started, shall we?


Baked Manicotti with Prosciutto
(adapted from Amanda's Cookin')

For the sauce:
2 - 28 oz cans of diced tomatoes, with juice (or the equivalent in fresh, diced tomatoes)
2 T extra virgin olive oil
3 medium garlic cloves, minced
1/4 - 1/2 tsp hot red pepper flakes (I used 1/2 tsp)
1/2 tsp kosher salt
2 T chopped fresh basil

For the filling:
3 cups ricotta cheese (I used fat-free)
2 cups grated parmesan cheese, divided (I used reduced fat)
2 cups finely shredded mozzarella cheese (I used 2% reduced fat)
2 large eggs, beaten
1/2 tsp kosher salt
1/2 tsp ground black pepper
2 T chopped fresh parsley
2 T chopped fresh basil
16 no-boil lasagna noodles (1 1/2 packages)
16 slices thinly sliced prosciutto


Preheat the oven to 375 degrees.

For the sauce: In a large saucepan, heat the oil, garlic and pepper flakes over medium heat until garlic is just starting to brown, about 2-4 minutes. Add the tomatoes and salt. Bring to a simmer and cook until sauce slightly thickens, about 15 minutes. Then turn off the heat and add the basil.

For the filling: Combine the ricotta, mozzarella, 1 cup of the parmesan, eggs, salt, pepper, parsley and basil. Mix well and set aside.

Assembly: Cook noodles in boiling water until just pliable (this will only take about 30 seconds!!). Drain (but, do not rinse) and then place in a single layer on clean kitchen towels.

Pour about 1 1/2 cups of sauce in the bottom of a 9 x 13 baking dish and spread evenly.

Place 1 slice of prosciutto on top of each noodle. Then spread 1/4 cup of cheese mixture over 3/4 of each noodle, on top of the prosciutto, leaving 1/4 of the noodle uncovered.


Then, starting from the end of the noodle with the cheese, gently roll the noodle into a tube shape and then arrange in the baking dish seam side down. Continue until all manicotti are rolled.


Top the manicotti evenly with the remaining sauce, making sure to cover each noodle completely.


Cover the dish with aluminum foil. Bake on the middle rack until the sauce is bubbling (about 40 minutes).

Remove manicotti from the oven and adjust the oven rack to the highest position (about 6 inches from the heating element). Sprinkle remaining 1 cup of parmesan cheese evenly over the manicotti. Do not replace the foil. Broil on LOW until cheese starts to brown. Remove from oven and let cool for 10 minutes before serving. Enjoy with crusty garlic bread and a fresh green salad. Serves 8.


*Note: This dish can be made ahead of time. After assembly, place a piece of parchment paper over the top of the sauce and then wrap the top with aluminum foil (a few times if freezing). Then place in the refrigerator for up to three days or freeze.
To cook, let stand at room temperature for 20 minutes or so (or thaw completely), then remove parchment paper, replace foil, then follow baking instructions.


Tuesday, March 1, 2011

Chicken and Sausage Paella

This isn't a traditional Paella dish, but is more of a family friendly version that is also very adaptable to your own tastes. It's pretty good, but needs your own personal touch to make it wonderful. For me, I would add more heat to it, possibly some seafood, and more bell pepper because I love the spicy/sweet combination. Have fun with this dish and make it your own wild creation!


Chicken and Sausage Paella
(adapted from familyfun. com)

2 T olive oil, divided
1 lb boneless chicken breasts, cut into bite sized pieces
salt and pepper to taste
16 oz (1 lb) sausage: Chorizo (which is classic in Paella dishes) or Kielbasa (which is less spicy), cut into half moon slices
1 small onion, chopped
1 large red bell pepper, finely chopped
2 cloves fresh garlic, chopped
2 cups medium-grain rice
1/2 tsp cumin
1/4 tsp cayenne pepper (start with a small amount and adjust to your taste or can omit)
1/2 tsp salt
Pinch of saffron
1 cup seeded and chopped tomato (or use small diced canned tomato, drained)
4 cups chicken stock or broth
1/2 cup frozen peas, thawed

Heat oven to 400 degrees. In a large skillet, heat 1 T oil over medium-high heat. Add the chicken to the skillet and season with salt and pepper to taste. Cook until done, about 5 minutes, then remove to a bowl and set aside.

Add the sausage to the skillet and saute it for 3-4 minutes until lightly browned. Then remove to same bowl as chicken.

Reduce heat to medium. Drain the oil/fat from the skillet and then add the remaining 1 T of oil to the skillet. Add the onion, red pepper, and garlic. Cook, stirring occasionally, until the vegetables are tender, for about 4-5 minutes. Then add the rice, peas, cumin, cayenne pepper, salt and saffron. Stir and cook rice mixture for about 1 minute. Remove from heat and then add the chicken and sausage to the rice mixture and stir to combine.


Transfer rice/meat mixture to a greased 9 x 13 baking dish. Scatter the diced tomato over the top. Carefully pour the chicken stock over the meat and rice.


Lightly tent some foil over the dish (you want steam to escape--I just lightly set the foil on the top without sealing the edges).

Bake for 30-40 minutes until most of the liquid has been absorbed and the rice is tender. Let the paella cool for a few minutes before serving. This will serve 6-8. Enjoy!