Pages

Wednesday, September 19, 2012

Homemade Vanilla Extract

Fall officially starts in a few days and I am excited for it because I love fall baking! Last year, at the beginning of fall, I decided to start making my own vanilla extract in order to save money. I do a LOT of baking in the fall and through the winter as well, so I go through a lot of vanilla. Making homemade vanilla extract is simple and really does save you money. It also makes a great holiday gift for all of your baking friends!

To make vanilla extract, you need 2 simple ingredients: vanilla beans and vodka.
I like to purchase Madagascar vanilla beans in bulk online, usually from Amazon. I usually buy a 1/4 pound at a time (which equals about 27 vanilla beans) and it costs under $15.00! In the grocery store, you can buy 3 vanilla beans for around $10.00.....so buying in bulk is much cheaper!
Another way to save money, is to buy cheap vodka. You don't need top-shelf vodka in order to make great vanilla extract. Just make sure you buy regular vodka, not the flavored stuff!

To make the vanilla, you will need 3 vanilla beans for every 8 ounces of vodka. Pour the vodka in a glass jar or bottle that has an air-tight cap. Spilt the vanilla beans and add them to the vodka in the bottle. Put on the cap, store it in a cool, dark place for about two months, shake the bottle every now and again, and then you will have perfect homemade vanilla extract. It's that easy! Enjoy!


This is what the vanilla extract looks like after 2 days. It will be a dark amber color at 2 months.


Monday, September 10, 2012

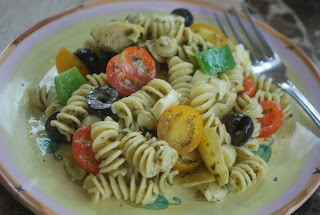
Pesto Pasta Salad

I love pesto. Seriously love it. My kids like it too, but my husband, the stinker that he is, when it comes to anything yummy, hates it. So, I rarely get to make anything with pesto at home.
I've made this pesto pasta salad only a handful times, but it is SO, SO good. The only times I ever get to make it is for pot-lucks at our church or for our school PTO events. I always get big compliments on the salad and many ask for the recipe. This salad is fairly simple, but as with so much in life, simple is always better!


Pesto Pasta Salad
(recipe adapted from Food.com)
10 servings (I usually make 1 1/2 of this recipe to serve a larger amount of people as a side dish)

1 lb rotini pasta (I use multi-grain 14 oz package)
1- 14 oz can artichoke hearts, drained, chopped coarsely
1- 10 oz container of cherry tomatoes (I like to use a mix of gold and cherry tomatoes), halved
1- 6 oz can of medium-sized black olives, drained and halved
1 large green bell pepper, chopped
12 oz fresh mozzarella cheese, cubed
8 to 11 oz of fresh or prepared basil pesto (to taste)
1/3 cup extra virgin olive oil
2 tsp minced fresh garlic
1/4 cup grated parmesan cheese (in a can)
1/2 tsp kosher salt, or to taste
1/8 tsp fresh cracked black pepper, or to taste


Cook rotini pasta according to package directions, just to al-dente. Drain and rinse with cold water; set aside.

In a very large bowl (like a punch bowl), gently mix together the chopped artichoke hearts, halved cherry tomatoes, halved black olives, chopped green pepper and cubed mozzarella cheese. Mix the pesto with the olive oil and add to the bowl, along with the parmesan cheese and minced garlic. Combine with the other ingredients.

Gently fold in the pasta and add the salt and pepper to taste. Mix and check seasoning again. Add more salt, pepper and parmesan cheese to your liking.

Serve immediately or refrigerate until ready to use. This salad can be made one day ahead of serving. When ready to serve, remove from the refrigerator about a half hour or so before, stir and add a little more olive oil, if needed, to "refresh" the salad. Enjoy!


Saturday, September 8, 2012

Berry Muffins and Chocolate Chip Muffins (Egg-Free)

A lot of people have go-to recipes for everything. I am one of those people. You name it, I'm sure I will have a tried and true recipe to give you, or a recipe from someone that I know, that will be without a doubt, a success.

I have three go-to muffin recipes that I alternate and make on a weekly basis, and they all happen to be egg-free. I often make banana chocolate chip muffins because I seem to always have left-over bananas and they are my kids' favorite, but I also make these berry muffins and regular chocolate chip muffins a lot. These recipes always turn out great and are so quick and easy to make.


Berry Muffins (Egg-Free)
(recipe adapted from The Food Allergy Mama's Baking Book)
Makes 12 muffins

2 cups all-purpose flour (can use 1 1/4 cups all-purpose and 3/4 cup white whole wheat flour)
2/3 cup granulated sugar
2 tsp baking powder
1/4 tsp salt
2/3 cup milk (can use rice or soy milk)
1/4 cup melted margarine or vegetable oil
1/2 tsp grated lemon zest
1 T fresh lemon juice
1 T water (slightly more if using white whole wheat flour)
1/2 tsp vanilla
1 cup fresh or frozen berries (blueberries or raspberries are great)
Sparkling sugar or granulated sugar, for sprinkling


Preheat oven to 400 degrees. Spray a 12-cup muffin pan with baking spray.

In a medium sized bowl, combine the flour(s), sugar, baking powder, and salt with a whisk.

In a separate medium sized bowl, mix together the milk, melted margarine (or oil), lemon zest, lemon juice, water, and vanilla.

Add the flour mixture to the milk mixture and stir with a spatula until just combined.

Gently fold in the berries using the spatula. Divide the batter evenly among the prepared muffin cups.
Sprinkle the tops with the sparkling sugar (or granulated sugar).

Bake for about 20 minutes (checking at 15 minutes), or until a tooth pick or cake tester inserted in the middle comes out clean.
Let muffins cool in pan for a couple of minutes, then remove to a wire rack to finish cooling. Enjoy slightly warm or at room temperature!

_______________________________________________


Chocolate Chip Muffins (Egg-Free)
(recipe adapted from Food Allergy Mama)
Makes 12 muffins

2 cups all-purpose flour (I use 1 cup all-purpose and 1 cup white whole wheat)
3/4 cup granulated sugar
2 tsp baking powder
1/2 tsp baking soda
1/4 tsp salt
1/2 cup margarine, melted
2/3 cup buttermilk (if you don't have buttermilk, mix milk with 1/2 T vinegar and let sit 5 minutes)
2 T water
1 1/2 T vanilla
1 cup mini chocolate chips


Preheat oven to 350 degrees. Spray a 12 cup muffin pan with baking spray.

In a large bowl, whisk together the flour(s), sugar, baking powder, baking soda and salt.

In a separate medium sized bowl, mix together the melted margarine, buttermilk, water, and vanilla.

Add the milk mixture to the flour mixture, and stir with a spatula until just combined. Fold in the chocolate chips.

Divide the batter evenly among the prepared muffin cups. Bake for 18-20 minutes (checking at 15 minutes), or until a tooth pick or cake tester inserted in the middle comes out clean.

Let cool for a couple of minutes in the pan and then remove muffins to finish cooling on a wire rack. Enjoy!


Monday, August 27, 2012

No-Bake Biscoff Chocolate Chunk Cookies

Traditional no-bake cookies are one of my husband's favorites (recipe here), but I have been on the search for a great peanut-free version of these cookies that would be school friendly, and I finally found one! Using Biscoff spread instead of peanut butter is a great alternative. The cookies have a great flavor and I happen to like these better because they are not quite as sweet (but trust me, they are still plenty sweet!). You must try these if you like no-bake cookies!


No-Bake Biscoff Chocolate Chunk Cookies
(recipe adapted from Picky Palate)
Makes about 40 cookies

8 T unsalted butter
2 cups granulated sugar
1 cup heavy cream
1 cup Biscoff (can use peanut butter)
3 cups quick oats
1/2 cup marshmallow bits (I used mini marshmallows that I chopped)
1 3/4 cups semi-sweet or milk chocolate chunks
 
 
In a large saucepan over medium heat, combine the butter, sugar and heavy cream. Heat, stirring frequently, and bring to a boil. Let boil for 2 minutes while stirring constantly. Remove from heat.
 
Stir in the biscoff until melted and smooth. Add the oats and marshmallows, stir well.
 
Add the chocolate chunks and only stir a few times so all of the chocolate doesn't melt (or you can keep stirring, if you like the chocolate to be completely melted).
 
Use a cookie scoop to scoop cookies onto wax or parchment paper. Let set for at least 30 minutes. Enjoy!


Monday, August 20, 2012

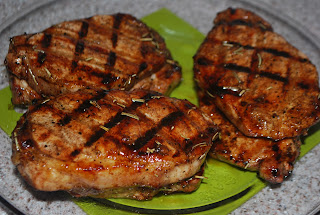
Honey-Balsamic Glazed Pork Chops

If you are looking for a seriously good and easy grilled pork chop recipe, look no further. The slightly-sweet and tangy-sour glaze is so delicious on the pork. My husband LOVES this recipe and requests it often. You must try it!


Honey-Balsamic Glazed Pork Chops
(recipe adapted from Saveur.com)
Serves 6

6 bone-in or boneless pork chops
5 T extra virgin olive oil
Kosher salt
Fresh cracked black pepper
2/3 cup balsamic vinegar
4  T honey
6 T unsalted butter
2 tsp dried rosemary or 3 tsp fresh


Put pork chops on a plate, drizzle with oil and season generously with kosher salt and pepper, on both sides. Refrigerate for 30 minutes.

Heat grill to medium-high heat.
Combine vinegar and honey in a 1-qt. saucepan and cook over medium heat until reduced to 1/2 cup (about 5 minutes or so). Stir in butter and rosemary and set aside.

Put pork chops on grill and cook, occasionally turning and basting generously with balsamic mixture, until browned and cooked through, 12–14 minutes. Transfer to a platter and let sit for 5 minutes before serving. Enjoy!

Thursday, August 16, 2012

Tortellini Spinach Bake in Creamy Lemon Sauce

This is a wonderful dish. It's one of my husband's favorites (there's bacon involved) and my kids gobble it right up. Tortellini is always a big hit in our house so I'm always looking for new ways to serve it. The lemon flavor in this dish is perfect and I love how you can control how much lemon you like. My husband likes lots of lemon, my kids prefer less so I usually prepare this recipe as it's written and it's perfect every time. It's creamy, refreshing, comfort food that you are sure to love!


Tortellini Spinach Bake in Creamy Lemon Sauce
(recipe adapted from Our Best Bites)
Serves 6-8

2- 9 oz packages of frozen or fresh cheese (or cheese/spinach) tortellini
6-8 strips thick sliced bacon, chopped
4-5 cloves garlic, finely minced
4 T flour
4 cups milk
1 tsp kosher salt (or to taste)
1/4 tsp black pepper
3 tsp dried basil
1/4 tsp red pepper flakes (1/2 tsp or more if you like spicy, which we do)
1 medium lemon
3-4 cups loosely packed baby spinach
1 1/2 cups grated mozzarella cheese, divided
1 1/2 cups grated Parmesan cheese, divided

Preheat oven to 350 degrees.

Fill a large stock pot with water bring and to a boil. Add tortellini and cook according to package instructions, adding salt to the water, if desired. Drain and set aside.

Meanwhile, place bacon in a medium sized skillet on the stove-top at medium-high heat. Cook until crisp. Remove bacon from pan with slotted spoon and set on paper towels to drain. Reserve about 3 tablespoons bacon drippings in pan and discard the rest.
Add garlic to skillet and cook until fragrant and tender, about 1 minute. Add flour to pan and stir with a whisk constantly for about 1 minute.
Slowly add milk and continue to stir with whisk until smooth. Add salt, pepper, basil, and red pepper flakes and bring sauce to a simmer.

While sauce is heating, use a microplane grater or a fine-holed cheese grater to zest lemon. Then cut lemon in half and remove juice.
Add 2 teaspoons zest and 2 tablespoons lemon juice to sauce (start with these amounts and then adjust to taste). Continue to stir until thickened, about 5 minutes. Remove from heat.

Place tortellini back in stock pot. Reserve 1 tablespoon of the cooked bacon and add the rest to the pasta mixture. Add spinach, 1 cup mozzarella cheese and 1 cup Parmesan cheese. Add sauce and gently stir to combine.

Place pasta mixture in an 9×9 baking dish and top with remaining 1/2 cup mozzarella and 1/2 cup Parmesan and also crumbled bacon.

Cover pan with foil and bake for 20 minutes. Remove foil and bake for an additional 5-10 minutes, until cheese on top is melted and pasta is bubbly throughout. Remove from oven and cool for a minutes before serving. Enjoy!

Tuesday, July 31, 2012

Chocolate Cupcakes

I shared with you my favorite vanilla cupcake recipe, now I would like to share my most favorite homemade chocolate cupcake. This recipe is just fabulous. The chocolate cake is flavored perfectly and the texture is amazing. This is my go-to chocolate cupcake recipe. It will not let you down! I paired these cupcakes recently with a whipped vanilla buttercream frosting that is soo good and is definitely a new favorite in our house! The frosting recipe is included below!


Chocolate Cupcakes
(recipe from annie's eats)
Makes 24 cupcakes

1/2 cup plus 1 T Dutch-process cocoa powder
1/2 cup plus 1 T hot water
2 1/4 cups all-purpose flour
3/4 tsp baking soda
3/4 tsp baking powder
1/2 tsp salt
2 sticks plus 1 T unsalted butter, room temperature
1 2/3 cups sugar
3 large eggs, room temperature
1 T vanilla extract
3/4 cup sour cream (full fat)


Preheat the oven to 350 degrees. Line cupcake pans with paper liners.

In a small bowl, combine the cocoa powder and hot water, and whisk until smooth. In a separate small bowl, whisk together the flour, baking soda, baking powder, and salt; set aside.

In a medium sized saucepan over medium heat, combine the butter and sugar. Cook, stirring occasionally, until the mixture is smooth and the butter is completely melted. Transfer the mixture to the bowl of an electric mixer and beat on medium-low speed until the mixture is cool, about 5 minutes or so.
Add the eggs one at a time, mixing well after each addition. Add the vanilla and then the cocoa mixture and mix until smooth.
With the mixer on low speed, add the flour mixture, alternating with the sour cream, beginning and ending with the dry ingredients. Mix each addition just until incorporated.

Divide the batter evenly between the prepared liners. Bake until a toothpick inserted in the center comes out clean, about 15-20 minutes. Let cool in the pan about 5-10 minutes, then transfer to a wire rack to cool completely. Frost with favorite frosting! Enjoy!


Whipped Vanilla Buttercream Frosting
(recipe from annie's eats)
Frosts 24 cupcakes

1 1/2 cups plus 2 T (3 sticks plus 2 T) unsalted butter, room temperature
3 cups confectioners’ sugar
Pinch of salt
1 vanilla bean, split lengthwise (optional)
2 T heavy cream
1 T vanilla extract

Using an electric mixer, whip the butter on medium speed until smooth, about 1 minute. Add the confectioners’ sugar to the bowl and mix on medium-low speed just until incorporated. Scrape the seeds from the vanilla bean pod (if using) into the bowl and add in the salt.
Beat on medium-high speed until smooth, about 1-2 minutes. Add the heavy cream and vanilla while on low speed, just until incorporated. Then whip on medium-high speed until light and fluffy, scraping down the bowl as needed, about 4-5 minutes. Enjoy!